A Python library for Terminal User Interfaces
by Joseph Carboni
As someone who does customer service and builds software, I’ve been building a backend API (https://github.com/shupe-carboni/backend) to handle certain services. As a matter of standard operating procedure, when I bite off a class of customer service requests to code into the API, that class of requests also becomes solely my responsibility. On the one hand, I like this, because I’m eating my own dog food, but on the other hand, using a backend API before you’ve got a web client can seem more difficult than the old-school methods.
I admit, I ought to get up to speed on a framework like Vue.js, but I thought using a pure-Python approach until I could get a web app up would be a fun way to go.
Urwid
This is when I came across Urwid, a Python library for building Terminal User Interfaces (TUIs) that allows you to create complex interfaces without directly handling low-level details. “Urwid offers an alternative to using the curses module directly and handles many of the difficult and tedious tasks for you.”[1]
Urwid uses composable Widgets to build an interactive interface that runs within what they call the “Main Loop”, which consists of Display Modules, the Widget Layout, and Event Loops. The Display Modules take care of drawing to the console and handling user input. Urwid comes with a powerful list-walker widget, which is useful for scrolling through lists (something I do a lot.)
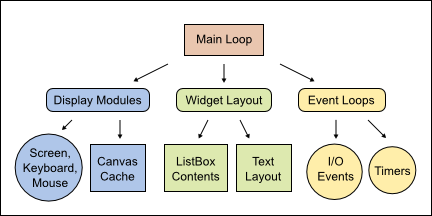
For the purposes of setting up a basic application, I will focus on the display portion and use the ListBox for organizing menu items.
Lets take a look at setting up a basic application using a combination of display widgets provided by Urwid.
Setting up
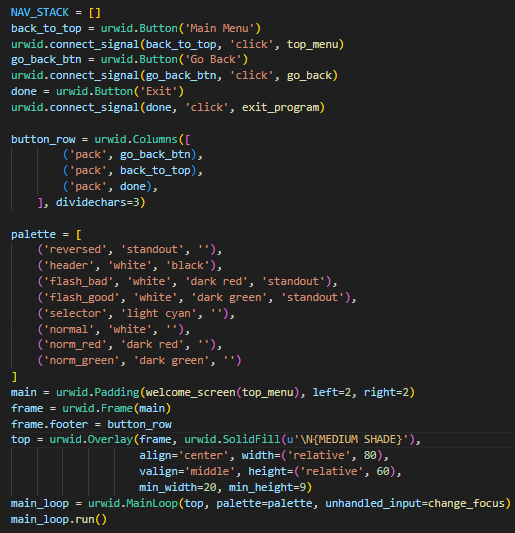
Here is an example of an initial setup. Let’s walk through what I’ve done here from top to bottom.
Footer Buttons
The Widget I’ll interact with the most for content is the Frame Widget (more on that in a bit,) which has 3 components: header, body, and footer. I’m setting up 3 buttons to place in Frame’s footer: “Main Menu”, “Go Back”, and “Exit”. After initializing the buttons, each button must be connected to a signal type – in this case, the ‘click’ signal – while providing callback methods to execute when the signal is emitted.
- Main Menu either returns a
ListBoxwidget, or swaps out the frame body with thatListBox, depending on how it’s called. - Go Back swaps out the frame body (and header) with the last element in the
NAV_STACK, a list of prior widgets (tuples of header and body widgets for the Frame) - Exit Program raises
urwid.ExitMainLoopto cleanly exit the program.
And now that we have the buttons set up, I put them into an urwid.Columns widget as a list of tuples, referencing the ‘pack’ method as a string argument in the tuples so that Urwid figures out the minimum size for these buttons, rather than have them take up the entire footer space. (Packaging widgets together with options via tuples is one way to set them up, but by no means the only way.)
The Color Palette
Setting up a color palette is simple. You can use a list of tuples in which the first element is your custom name for the style, and the next elements represent, in this order, the foreground (text) color, background color, and optional values for terminals with different color settings like monochrome and 256-color terminals. This list of tuples will be passed into the MainLoop constructor and registered for use later.
See here for more about palette color options.
Setting up the top widget
This graphic is a basic overview of the Display widget types and how they work.
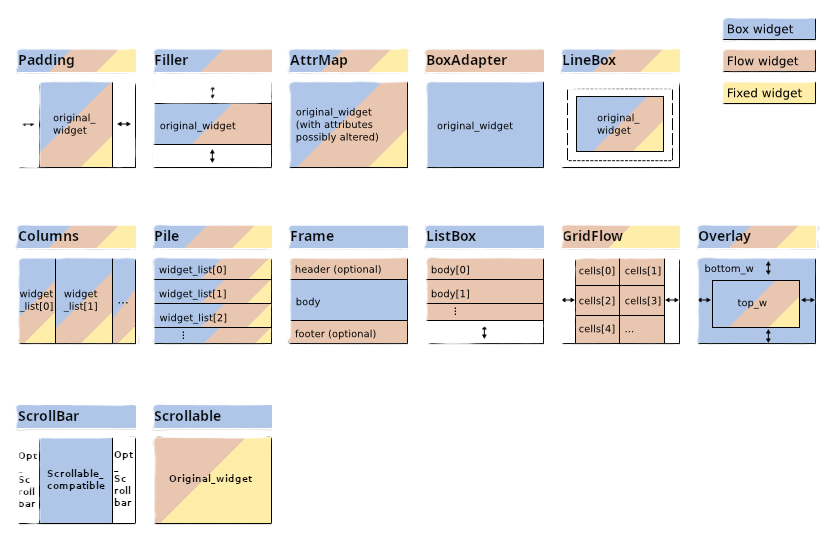
Next in my setup, I compose a few different types of display widgets:
- Set up my “Welcome Screen”, passing in a callback to my first underlying menu (top menu), within a
urwid.Paddingwidget - initialize an
urwid.Framewidget and pass theurwid.Paddingwidget into it, which sets it as the Frame body - Place the buttons (Main Menu, Go Back, Exit) into the Frame footer by setting them to
frame.footer - Place the
urwid.Framewidget within anurwid.Overlaywidget as the top widget, and usingurwid.SolidFillfor the bottom widget, which fills the screen with a single character – in this case, I used the Unicode character “MEDIUM SHADE” by its name.
Initialize the Main Loop
Now that everything is set up, I call urwid.MainLoop, passing in the composed widget top, my color palette, and a method used for switching focus from the frame body to the frame footer, and vice versa. Any “unhandled input”, such as a tab, will pass through my callback for handling – in my case, toggling focus between the body and footer. This gives the user a way to access those footer buttons with the keyboard.
And then run it!
Callbacks
Up through now, I’ve glossed over the callback functions, so let me show you an example – a method for dynamically building list menus.
A Menu builder
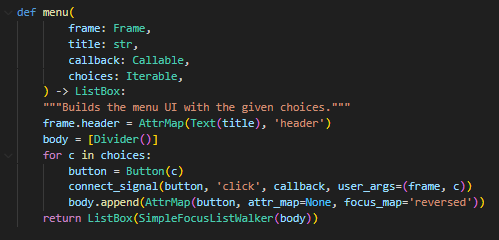
This method is doing several things:
- Takes the provided
titleand replaces theFrameheader with whatever that value is.- You’ll notice the string is wrapped within an
urwid.Textwidget as well asAttrMap, and I’m passing in the string ‘header’ toAttrMap. ‘header’ refers to one of the named color palette options provided toMainLoop. In effect,AttrMapis mapping those coloring attributes to thisTextWidget.
- You’ll notice the string is wrapped within an
- Iterates through the list of
choices, in this case just strings, sets each choice as thelabelattribute of aButton, and connects the button to the ‘click’ signal.- Note that a callback method and the choice selected are both passed into
urwid.connect_signal, and the choice is given specifically touser_args. Anything inuser_argswill pass to the callback as a positional argument.
- Note that a callback method and the choice selected are both passed into
- Appends each button to
body, a list of widgets, using an impromptu attribute mapping.attr_map– default (non-focused)focus_map– styling for the element in focus, here using the named palette attribute ‘reversed’ that was passed toMainLoop, which stands in as an alias for ‘standout’. ‘standout’ reverses the foreground and background colors.
- Creates and returns the
ListBox, passing in aSimpleFocusListWalker, which takes the list of button widgets.
The return of this method is used within a Decoration widget. I initially used the Padding widget, so in this case it would be placed within that to swap out the contents of frame.body.
Using functools.partial
In addition, this menu-builder can be part of a menu chain, passing along selected arguments by stuffing them into the callback using functools.partial.
Consider this example for confirmation to perform some permanent action on a selected item. This is itself a callback method used when the previous menu item (a “rating”) is selected. I’m using a partial within a partial here, due to how my helper method, show_menu_screen, expects to receive it, which also updates the navigation stack and piles on flash messages into the frame header.

The key here is the second partial, which sets up the method with a predefined argument as the callback, in this case, the “rating” selected from the prior menu.
You may notice also that the selected item passed along is not necessarily a string. Anything can be passed along from a button click in reference to the button label selected, so long as you’re able to generate some sort of string to pass to Button as its label. So, you could modify the menu builder to take in an object and, for instance, call str() on it or pull a specific attribute value for a label.
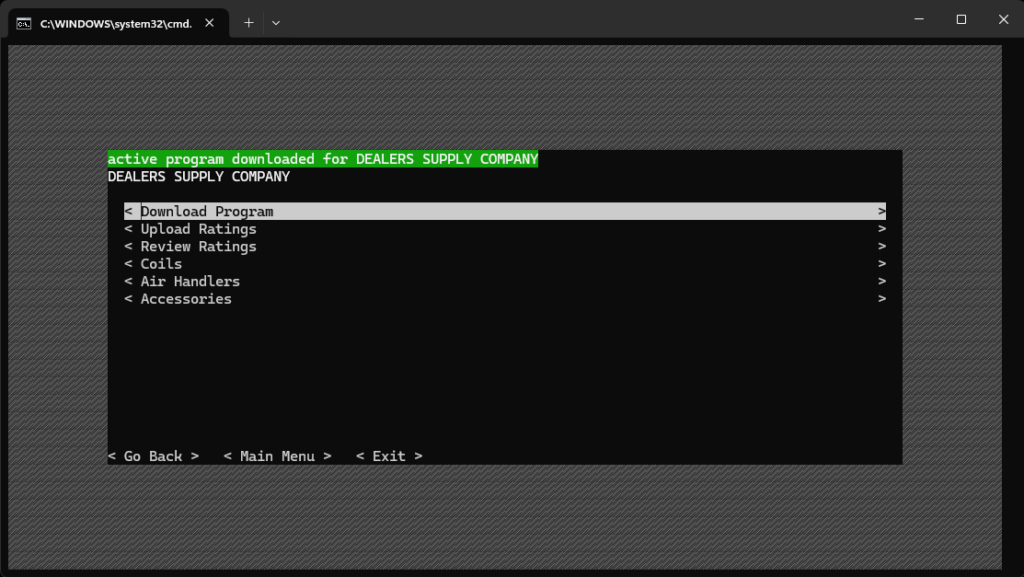
Final Product
I have only barely scratched the surface of what can be done with Urwid’s composable widgets. And yet, I found that I was able to get a working app up and running within a reasonable amount of time and effort.
The end result? A menu-based TUI with flash headers, footer buttons, scrollable menus and actions capable of any behavior I want to program in. In some sense, it starts to look like a “browser” when it all comes together. Here’s a snapshot of a successful file download action, demonstrating most of the elements discussed: overlay with a solid fill background, footer buttons, attribute mapping for a frame header text widget, and a list-like menu.
There’s a lot that I left out or didn’t cover. Also, this project is not currently on Github. So, if you’d like to see more, feel free to reach out to me!
ABOUT THE AUTHOR
Joseph Carboni is a multifaceted programmer with a background in bioinformatics, neuroscience, and sales, now focusing on Python development. He developed a ribosomal loading model and contributed to a neuroscience paper before transitioning to a six-year sales career, enhancing his understanding of business and client relations. Currently, he’s a Python Developer at Shupe, Carboni & Associates, improving business processes, and runs Carboni Technology for independent tech projects. Joseph welcomes collaborations and discussions via LinkedIn (Joseph Carboni), Twitter (@JoeCarboni1), or email (joe@carbonitech.com).
PUBLISH YOUR WRITINGS HERE!
We are always looking to publish your writings on the pyATL website. All content must be related to Python, non-commercial (pitches), and comply with out code of conduct.
If you’re interested, reach out to the editors at hello@pyatl.dev